Google Maps in React Native Part 2: Basic Usage
TL;DR: We'll create a simple map view and add some markers on it.
This is part of a react-native tutorial series, in which we’re going to dive into how we can display maps inside a React-Native app.
If you want to follow along this series I have setup a repo in which every part will have its starting and ending points in their corresponding branches.
About This Article
We’re going to have a look at some basic usage of react-native-maps by implementing a view with buttons that trigger certain markers on the map.
MapView
The MapView component of react-native-maps is the main component that we will be using throughout the series to display our maps.
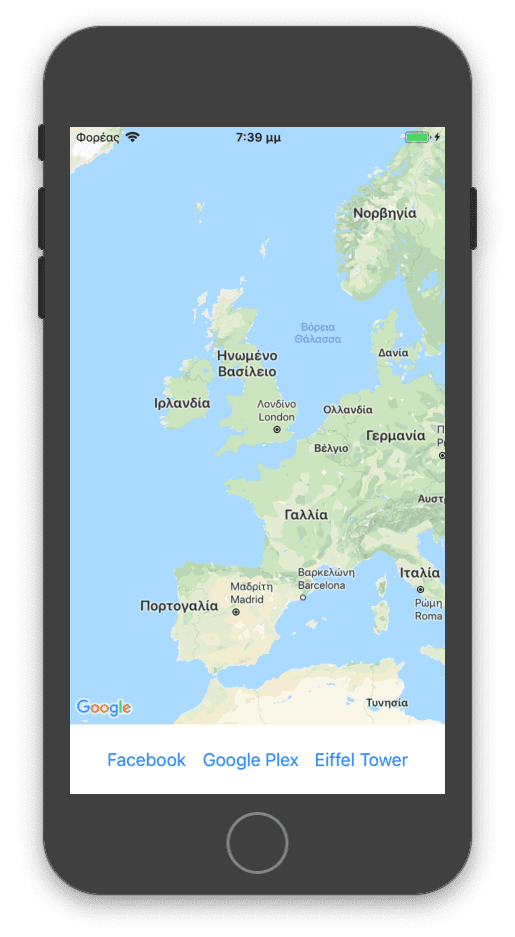
Lets create a basic layout that includes a MapView to get us started. What we want is to have some buttons that will show various places on the map when pressed. For now, our places of interest will be Facebook, Google Plex and the Eiffel Tower:
import React, { Component }                       from 'react';
import { StyleSheet, View, Button, SafeAreaView } from 'react-native';
import MapView, { PROVIDER_GOOGLE }               from 'react-native-maps';

/** Models / Types */
import type { Region }                            from 'react-native-maps';

type Props = {};
type State = { region: ?Region, }
export default class App extends Component<Props, State> {
  constructor(props: Props) {
    super(props);
    this.state = { region: null };
  }

  /** Button Handlers */

  _showFacebook = (): void => {};
  _showGoogle = (): void => {};
  _showEiffelTower = (): void => {};

  /** Renderers */

  render() {
    return (
      <View style={ styles.container }>
        <MapView          provider={ PROVIDER_GOOGLE }          region={ this.state.region }          style={ styles.mapViewContainer } />
        <View style={ styles.buttonsContainer }>
          <Button title={ 'Facebook' } onPress={ this._showFacebook } />
          <Button title={ 'Google Plex' } onPress={ this._showGoogle } />
          <Button title={ 'Eiffel Tower' } onPress={ this._showEiffelTower } />
        </View>
        <SafeAreaView />
      </View>
    );
  }
}

const styles = StyleSheet.create({
  container: { flex: 1, backgroundColor: 'white' },
  mapViewContainer: { flex: 1 },
  buttonsContainer: {
    flexDirection: 'row',
    justifyContent: 'center',
    paddingVertical: 16
  }
});
To confirm we are on the same page so far, our app looks like this:
Regions
Whenever you see the map in an app, you are actually looking at a “region”, in other words, an area of view. The largest that area, the more you zoom away from the center of the region.
The region is defined by the center coordinates and the span of coordinates to display.
A region is described by the following interface:
   export interface Region {
        latitude: number;
        longitude: number;
        latitudeDelta: number;
        longitudeDelta: number;
    }
The latitude and longitude properties are the ones that define the center of the region, and their corresponding deltas (latitudeDelta and longitudeDelta) define the amount of north-to-south distance (measured in degrees) to display on the map.
Unlike longitudinal distances, which vary based on the latitude, one degree of latitude is always approximately 111 kilometers (69 miles).
You can check here on a more detailed and visual explanation.
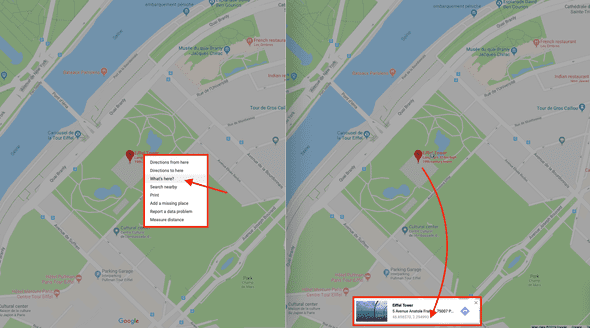
If you want to find a place’s coordinates head over to Google Maps and right click on your place of interest and select What's here?. There will be a small modal view displaying the latitude and longitude of that place you clicked on.
For example the Eiffel Tower’s coordinates are 48.858570, 2.294493, so a good region to display the Eiffel Tower in a map would be:
const EIFFEL_TOWER = {
  latitude: 48.858570,
  longitude: 2.294493,
  latitudeDelta: 0.02,
  longitudeDelta: 0.02
};
Likewise the regions of Facebook and Google Plex would be:
const FACEBOOK = {
  latitude: 37.485178,
  longitude: -122.147135,
  latitudeDelta: 0.02,
  longitudeDelta: 0.02
};

const GOOGLE_PLEX = {
  latitude: 37.422264,
  longitude: -122.084036,
  latitudeDelta: 0.02,
  longitudeDelta: 0.02
};
Now lets make our buttons change this.state.region to their corresponding regions and see what happens:
// ... imports

const FACEBOOK = {  latitude: 37.485178,  longitude: -122.147135,  latitudeDelta: 0.02,  longitudeDelta: 0.02};
const GOOGLE_PLEX = {  latitude: 37.422264,  longitude: -122.084036,  latitudeDelta: 0.02,  longitudeDelta: 0.02};
const EIFFEL_TOWER = {  latitude: 48.858570,  longitude: 2.294493,  latitudeDelta: 0.02,  longitudeDelta: 0.02};
// ...
export default class App extends Component<Props, State> {
  // ...

  /** Button Handlers */

  _showFacebook = (): void => this.setState({ region: FACEBOOK });  _showGoogle = (): void => this.setState({ region: GOOGLE_PLEX });  _showEiffelTower = (): void => this.setState({ region: EIFFEL_TOWER });
  /** Renderers */

// ...
}
This should look like this:
Markers
Markers are pretty much a straight forward concept. They are just “pins” that mark specific coordinates you provide to them.
react-native-maps exposes a Marker component to use as a MapView child that, among other, accepts a coordinate that is described by the following interface:
export interface LatLng {
        latitude: number;
        longitude: number;
    }
We already have latitude and longitude data for our places of interest so adding markers for them should be pretty easy:
// ...imports
import MapView, { PROVIDER_GOOGLE, Marker } from 'react-native-maps';// ...imports
// ...
export default class App extends Component<Props, State> {
  //...

  /** Renderers */

  render() {
    return (
      <View style={ styles.container }>
        <MapView
          provider={ PROVIDER_GOOGLE }
          region={ this.state.region }
          style={ styles.mapViewContainer }>          <Marker coordinate={ {            latitude: FACEBOOK.latitude,            longitude: FACEBOOK.longitude          } } />
          <Marker coordinate={ {            latitude: GOOGLE_PLEX.latitude,            longitude: GOOGLE_PLEX.longitude          } } />
          <Marker coordinate={ {            latitude: EIFFEL_TOWER.latitude,            longitude: EIFFEL_TOWER.longitude          } } />
        </MapView>        {//...}
      </View>
    );
  }
}
And here’s the result:
Conclusion
There are a lot more cool stuff we can do, like animating the region changes, toggling markers, implement some searching functionality, but all these are out of the scope of a basic usage, so we will check those in a later article.


